Setting up safe Masternodes using a 'hot/cold' setup.
In this tutorial, we will run one or more masternodes in a multi-wallet ('hot/cold') setup.
-
A local wallet (on your PC or laptop) will contain the funds for the masternodes and has the ability to start (or actually register) them remotely. This is called the 'cold' part because if the masternodes are running, you can close the client wallet and even shut down your PC.
- The masternode(s) will run on a server 24/7. Therefore they are called the 'hot' part. But the masternode wallets will contain no funds, ever. So your funds will be safe against hackers.
Your masternode payouts will go to the client, even when it is closed. The money is on the blockchain, after all.
A note on the previous ('bumbacoin') tutorial
The previous 'bumbacoin' tutorial described a one-wallet masternode configuration. However, that specific configuration is unsafe for three reasons:
- masternodes contained their own funds in their wallet. Hackers could steal this money by simply copying
wallet.dat; - the old tutorial recommended use the collaterals accounts' private key as a masternode key. Hackers could steal the money by importing that key into their empty wallet;
- many people using cronjobs and passed the wallets' password as one of the parameters. Hackers could use that to open the
wallet.datfile even if it was password-protected.
Also, the old masternode setup has hardly any benefit to the network because in the current setup, many people get masternode payouts without actually running a masternode! They find their masternode "stopping after an hour" and solved that (they think) with a 'start-many' cronjob to restart it.
In fact, this cronjob just restarts their payments for one only hour and not the masternode itself.
This tutorial proposes a way to really run your masternodes, with a hot/cold setup to keep your funds safe.
If you want to migrate from a one-wallet fo multi-wallet stup, also see some tips in this blog.
Configuration of the local, controlling client
Perform these steps to setup a local, controlling client on your PC or laptop. Again: the client does not need to be on 24/7 (only the masternode does, which we will install later).
1. Install the GUI (QT) version of the wallet
Go to the ExclusiveCoin website and select 'wallets' from the menu. At the time of this writing (july 2017), the latest wallet is v1.2.0.0-61404. Download the 'QT' (= with user interface) version of the wallet that matches your system:
Windows
- Download the 32-bit (
exclusivecoin-qt-32bit.exe) or 64-bit version (exclusivecoin-qt-64bit.exe) of the software. If you don't know if your computer is 32 or 64-bit, right-click 'My Computer', 'Properties'. - Copy the file to a location of your choice, e.g.
C:\Wallets\ExclusiveCoin\exclusivecoin-qt-64bit.exe
On Windows, the configuration and blockchain files will be in %APPDATA%\ExclusiveCoin, usually C:\Users\{YOUR_USER_NAME}\AppData\Roaming\ExclusiveCoin.
The AppData folder may be hidden.
To quickly go there, press WINDOWS-R and enter %APPDATA%\ExclusiveCoin.
Linux
These are insstruction for the QT version of the wallet. Instructions for the daemon-version are below, in the Masternode part.
- Download
exclusivecoin-qtwith your favorite browser. - Use a file manager to move it to a location of your choice, preferably on your PATH, e.g.
/usr/local/binor~/bin/exclusivecoin-qt(~is you home directory).
On Linux, the configuration and blockchain files will be in ~/.exclusivecoin/.
You need to do a ls -a to see folders that start with a dot.
Mac OSX
To install on Mac:
- Download and install
ExclusiveCoin-Qt-OSX-v1200.dmg
On the Mac, the configuration and blockchain files will be in: ~/Library/Application Support/ExclusiveCoin/.
~ is you home directory.
2. Start the wallet and sync or download the blockchain
When you start the wallet or the first time, it will create an empty wallet. Then it will start downloading the blockchain to your computer. This process may take many hours.
To speed up the process, you can stop the application and download a recent blockchain from cryptochainer.com.
It is called ExclusiveCoin_blockchain.zip, approx. 350MB.
To install that:
- Close the application;
- Go to the blockchain directory mentioned above;
- remove the folders
database,txleveldband the filesblk0001.datandpeers.dat.
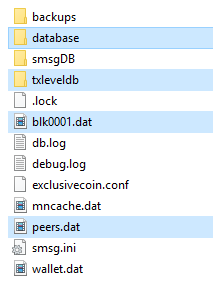
- Then replace them with the files from the ZIP file.
- Restart the application. Synchronizing the blockchain should now take only a few minutes.
Wait for the wallet to synchronize.
3. Protect your wallet, backup your files.
The directory mentioned above contains configuration files, the blockchain and most importantly: your wallet (wallet.dat).
You wallet contains the keys you need to access you funds. That means that:
- if you loose your wallet, you will never be able to access the funds again;
- Anyone who has access to your wallet file (and this includes computer viruses) has access to your funds.
To protect your funds, you should first encrypt your wallet:
- Click 'Settings' (menu), 'Encrypt Wallet...' And follow the instructions.
Second, you should make sure to backup the wallet and configuration files in the directory mentioned before.
Whenever you make any changes to the files in the ExclusiveCoin directory, make a backup first!
And ALWAYS make a backup of your wallet.dat file.
Never store wallet backups on your computer as they are targeted by hackers and computer viruses. Instead, store them on external drives (and disconnect them) or one or more USB sticks.
Also: stop the application before you backup any files. If the application is still running, your backup files may get corrupted and unusable.
4. Create a configuration file for the local client (if needed)
The primary configuration file of the Exclusivecoin wallet is exclusivecoin.conf in the directory mentioned above.
By default, this file is empty.
In most cases, the local client should run fine with an empty configuration file.
However, there are a few things you can configure, so lets have a look at an example:
# -------------------------------------------------------------------------------------------------
# Example exclusivecoin.conf
# LOCAL CLIENT VERSION (=the wallet that controls the masternodes)
# -------------------------------------------------------------------------------------------------

#
# By default, staking of (mature, >24h) coins is enabled.
# Note that the masternode collateral will be excluded from staking and
# you will only stake when your local client is open with its wallet unlocked.
# -------------------------------------------------------------------------------------------------
# Default: 1 (on). To turn it off:
# staking=0

#
# For peer-to-peer connections:
# If your machine cannot determine its IP address or you use a different port, specify them here.
# -------------------------------------------------------------------------------------------------
# externalip=YOUR_EXTERNAL_IP
# Default P2P port: 23230. To change it:
# port=YOUR_PORT

# RPC server. Not needed for local client.
# -------------------------------------------------------------------------------------------------
# Default: server=0 (off). To use RPC:
# server=1
# rpcuser=ALPHANUMERIC_CHARS_ONLY_NO_SPECIAL_CHARS
# rpcpassword=ALPHANUMERIC_CHARS_ONLY_NO_SPECIAL_CHARS

# Localhost RPC calls are always allowed (no need for rpcallowip=127.0.0.1)
# Example for use on a private subnet:
# rpcallowip=192.168.1.*

# Default RPC port: 23231. To change it:
# rpcport=YOUR_RPC_PORT

#
# You could add some nodes for a quick connection.
# An up-to date list is here: https://bitcointalk.org/index.php?topic=1546005.0
#
# UPDATE: Not needed and no longer recommended.
# See (for reddcoin, but applies) https://www.reddcointalk.org/post/3111
# -------------------------------------------------------------------------------------------------
# addnode=nodes.exclusivecoin.pw
# addnode=1.2.3.4
If you made any changes to the configuration file, restart the application. The safest way to do that is to use the 'File' menu, then 'Exit', because you application may be configured to just minimize when you use the close button.
What will we need for a masternode configuration?
We will now collect the information that is needed to register your masternode(s). To see what we will need, click 'Masternodes' (left), then 'Create...:':
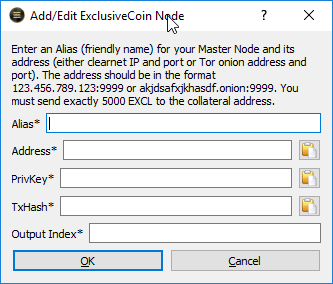
So to register a masternode, we will need:
- An 'Alias' (will be something like "Masternode1")
- An 'Address', which will be the IP address and port of the masternode;
- A 'PrivKey', which will be a unique masternode key to identify it;
- A 'TxHash' and 'Output Index' to identify the deposit of 5000 EXCL collateral.
To collect this information, open a text file to write down the configuration for each masternode. For now, just start with the masternode names, e.g. 'Masternode 1', 'Masternode 2'.
5. Get the masternode IP-address and port
IP-address
You will have to find out at which IP-address your masternode will be running.
- If the masternode will be running on a Virtual Private Server (VPS), its IP-address will have been given to you by the provider;
- If you run the masternode from your house, your router will be able to tell you the external IP-address;
- You can also use online services like http://www.whatsmyip.org/
Port
By default, ExclusiveCoin uses port 23230 for peer-to-peer communication. You might want to use another port, especially when you run multiple masternodes on one IP address.
Write down the IP-address and port of each masternode in the text file you created before.
We will discuss 'Port Forwarding' and 'Network Address Translation' (NAT) later, when we install the masternode itself.
6. Create unique masternode keys
Each masternode will need to be identified by a unique key. To generate these keys, do the following:
- Click 'Help', 'Debug window', 'console' to open the console window;
- Type
masternode genkeyto generate a unique key; - Copy/paste the masternode keys to the text file you created before;
- Do this for each masternode.

It's good to know that:
- Masternode keys are nothing special. They are just random values that have no special relation to the wallet or specific accounts within it;
- You can generate as many keys as you need by just repeating
masternode genkeyand use them on any of your masternodes; - Old installation guides may have told you to use the private key of the collateral account (from the next step) as a masternode key. Never do that as it would enable hackers to steal your funds.
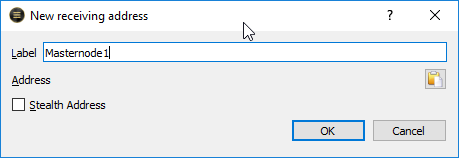
7. Create receiving account addresses for each masternode
Next, we'll create new receiving addresses for each masternode. You will later transfer 5000 EXCL to each of them.
To create a new receiving address, either:
- From the console window, type
getaccountaddress "Masternode 1" - or in the User interface: click the
Receivemenu on the left, then click theNew Adressbutton at the bottom and enter a name, e.g. 'Masternode 1' - Create an account for each masternode.
If you make a mistake entering the accounts' name, you can always correct that in the 'Receive' screen.
8. Transfer 5000 EXCL to each of the accounts
Next, you'll need to transfer 5000 EXCL to each of the generated accounts.
It is very important to realize that it's the transaction that counts, not the resulting balance. For this reason, you must deposit the money in one single transaction of exactly 5000 EXCL.
To do this:
- You may have to take the fee / transaction costs into account:
- When you transfer from an exchange, you'll need to add the fee yourself. So if the fee (or 'transaction costs') are 0.001 EXCL, you'll have to transfer 5000.001 EXCL in order to deposit exactly 5000 into the account (it will tell you on screen, check that);
- When you transfer from the Exclusivecoin wallet: you can deposit exactly 5000 EXCL and the fee will be added automatically. It is configured in 'Settings', 'Options'.
- If you already put money in your account in multiple transactions, you will need to deposit it again as one single transaction. You can deposit to a new account, or even the same account (this may sound stupid, but we need one single transaction on the blockchain).
- You should make sure the 5000 EXCL stays unspent. If you ever take take out profits, you'll have to take special precautions to not damage the 5000 EXCL collateral. Simply leaving enough balance will not work. See one of the Frequently Asked Questions (below) for more information.
It also means that:
- It does not matter if there is more than 5000 EXCL in your account. In fact, that will happen as soon as you start receiving masternode rewards;
- in theory, you could use one account for multiple masternodes as long as they each have their own 5000 EXCL transaction to that account. It would be very confusing, though.
You will have to wait 10 confirmations (about 10 minutes) for the funds to become available.
9. Write down the transactions hash and output index
With 5000 EXCL in the account(s), it's time to collect the information about the transactions that took place.
For each masternode, we will need the transaction id of the 5000 EXCL deposit and its output index within that transaction. The output index is needed because each ExclusiveCoin transaction can have multiple 'inputs' (where the money came from) and multiple 'output' (where the money went). We'll need the index of the output that actually put the 5000 EXCL into our account.
This may sound difficult, but the wallet actually makes this quite simple for us:
- First, make sure your wallet is unlocked (I'm not sure but I think this is needed to get the information we need);
- From the console window, type
masternode outputs. This will return a list of all valid transactions ID's and their output indexes. There should be one for each masternode. If not, you did something wrong. See one of the Frequently Asked Questions (below) for more information. - If you have multiple masternodes, you will need to find out which transaction belongs to which masternode. Use the 'Transactions' screen to do that: double click each 5000 EXCL transaction to see which transaction belongs to which masternode account.
- Copy/paste the values to the text file you created earlier. Make sure you put the right transaction id with the right masternode!
10. Register the masternodes
Finally we have all the information we need to configure our masternodes in the local client:
- open the
masternodesmenu (left side); - Make sure the
My Master Nodestab is selected; - Click the
Create...button at the top and enter the values you collected in the text file.
Enter the following:
- For 'Alias', enter the name of the masternode, e.g. "Masternode1";
- For 'Address', enter the IP-address and port of the masternode;
- For 'PrivKey', enter the unique masternode keyof the masternode;
- For 'TxHash' and 'Output Index', enter the transaction ID and output index of the 5000 EXCL deposit.
All data is stored in a file called masternode.conf.
It's important to realize that:
- the local client often needs no
exclusivecoin.conf, but it will have amasternodes.conffile containing the masternodes in controls; - the masternodes will need a
exclusivecoin.conf, but despite the name, they will have nomasternodes.conffile.
11. You can actually "Start" your masternodes now... even if they don't exist.
***"Wait... I haven't installed my masternodes yet! And you're telling me I can "start" them... what's that supposed to mean? And if I would, would I earn masternode rewards then?"
Well, as a matter of fact... yes, you would.
The fact is: many masternode owners think they run a masternode (and get payed for that). But in fact, they're not running anything (and still get payed for that). If you're already running a masternode and it 'stops after an hour' and you created a cron-job to restart it, you're probably one of those people.
So let's see what's going on:
When you "start" your masternodes from you client, it will usually tell you that it 'succesfully started' the masternode (you'll need to unlock your wallet b.t.w). In the 'My Masternodes' list, they would appear as 'Masternode Running'. And if you would select the 'ExclusiveCoin Network' tab, it would appear in the masternode list.
But, what "started" really means is that your client successfully registered your masternode with the system and that the registration was accepted by the other peers. "Masternode Running" and the appearance in the masternode list, only means that the masternode was registered. Only if you have a masternode process running, that would pickup its registration and start its masternode tasks. The good part is: you will get masternode payouts for just the registration of your masternodes. They do not need to be running...!
So, why even bother installing the masternode? Well, because without it, its registration would only last about an hour.
A masternode needs to ping the system to prove it's alive. If it doesn't, it will be removed from the list in about an hour.
This explains why many people think their masternode is running, while it's actually not: its only registered with the system. It also explains why many people think their masternodes stop after an hour. That's not their masternodes stopping, its their registration timing out. It also explains why a cronjob to 'start' (or 'start-many') the masternodes seems to work: the re-registration makes the masternode rewards resume. But it will not actually start or restart the masternode itself.
So now, lets install the masternode and see if we can get it actually running.
Configuration of the (remote) masternode
The remote masternode will basically be an empty wallet, configured to run as a masternode.
1. Install the wallet on the server
On a server with a user interface, like Windows or a desktop Ubuntu installation, you could run the QT (user-interfaced) wallet as a masternode.
But most people will run the masternode on a Linux server (e.g. on a VPS), with a command line interface instead of a graphical user interface. For that, you'll need a headless version of the wallet, also called a daemon. You can either download it or compile it from the sources, if you're adventurous.
Downloading a headless/daemon version of the wallet (Linux)
'bumbacoin' release a precompiled version of the Linux deamon:
First, lets go to the directory where we will put the deamon.
A good place is /usr/local/bin.
# Goto bin directory
cd /usr/local/bin

# Download the daemon (and rename it)
wget -O exclusivecoind https://github.com/exclfork/ExclusiveCoin/releases/download/v1.2.0.0-daemon/exclusivecoind-ubuntu-v1200

# Add read/execute rights, only for the owner of the file.
chmod 500 exclusivecoind
This should put an executable exclusivecoin in your /usr/local/bin directory.
Because that directory is on your path (check with echo $PATH) you can start it from any directory.
Recompiling a headless/daemon version from the sources (Linux)
Read my blog Compiling an ExclusiveCoin daemon from source.
2. Run the deamon once to gererate configuration files
For the Linux Deamon, type exclusivecoind once to let it create an empty configuration file and provide your with some tips:
# Go to your home directory
cd ~

# Start the deamon once (it might tell you to enter some configuration)
exclusivecoind -deamon

# Check for the .exclusivecoin directory
ls -al

# Go there
cd .exclusivecoin

# List the files, we should have an exclusivecoin.conf in there.
ls -al

# Use you favorite editor to edit it.
3. Create a configuration file for the masternode
Again, your configuration file should be in %APPDATA%\ExclusiveCoin (Windows), ~/.exclusivecoin/ (Linux) or ~/Library/Application Support/ExclusiveCoin/ (OSX).
For a masternode, you need to configure the following.
- If you run a deamon, you'll need to activate the RPC server (
server=1) and provide it with arpcuserandrpcpasswordto be able to interact with it; - You need to tell you wallet to run as a masternode (
masternode=1) and provide it with its unique key; - You may need to configure the external IP address and port;
- You could add
addnode=IPlines for some initial connections (not needed and no longer recommended).
Here is an example to copy and paste (to copy text from a terminal, simply select it with your mouse. To paste, click right or middle mouse button):
# Example exclusivecoin.conf
# MASTERNODE VERSION
# -------------------------------------------------------------------------------------------------

# RPC server. Only needed for the Linux deamon:
# -------------------------------------------------------------------------------------------------
# Default: server=0 (off). To use RPC:
server=1
rpcuser=exclusivecoinrpc
rpcpassword=ALPHANUMERIC_CHARS_ONLY_NO_SPECIAL_CHARS

# Localhost RPC calls are always allowed (no need for rpcallowip=127.0.0.1)
# Example for use on a private subnet:
# rpcallowip=192.168.1.*

# Default RPC port: 23231. To change it:
# rpcport=YOUR_RPC_PORT

#
# To run this wallet as a Masternode, enter its masternode privKey and the external IP address and port
# -------------------------------------------------------------------------------------------------
masternode=1
masternodeprivkey=MASTERNODE_PRIVKEY_HERE
masternodeaddr=YOUR_EXTERNAL_IP:YOUR_EXTERNAL_PORT

#
# A masternode should never have coins in its wallet. So staking can be disabled.
# -------------------------------------------------------------------------------------------------
# Default: staking=1. To turn it off:
staking=0

#
# For peer-to-peer connections:
# If your machine cannot determine its IP address or you use a different port, specify them here.
# -------------------------------------------------------------------------------------------------
# externalip=YOUR_EXTERNAL_IP
# Default P2P port: 23230. To change it:
# port=YOUR_PORT

#
# You could add some nodes for a quick connection.
# An up-to date list is here: https://bitcointalk.org/index.php?topic=1546005.0
#
# UPDATE: Not needed and no longer recommended.
# See (for reddcoin, but applies) https://www.reddcointalk.org/post/3111
# -------------------------------------------------------------------------------------------------
# addnode=nodes.exclusivecoin.pw
# addnode=1.2.3.4
3. Open ports / configure filewall
When your server is behind an internet modem, it might be necessary to use Network Address Translation to send all traffic to port 23230 on you internet connection to the 23230 port on your server.

If you need more information on this, see the Bitcoin Core manual on this subject: enabling-connections
3. Start the wallet and sync or download the blockchain
If you use a QT client, just follow the same instructions you used for the local client.
If you use a Linux deamon, you can start, stop and use it as follows:
# Start the deamon
$ exclusivecoind -deamon

# To stop the deamon:
$ exclusivecoind stop

# To interact with it:
$ exclusivecoind getinfo
{
    "version" : "v1.2.0.0-61404",
        "blocks" : 137863,
    ...
}
Again, on first startup, the wallet will create an empty wallet and start downloading the blockchain to your computer. To speed up the process, you can download a recent blockchain.
Wait for the wallet to synchronize.
To check if it's finished, check the blocks value from exclusivecoind getinfo and compare it to a synchronized client or a blockchain explorer on internet.
To keep a daemon process running after you log out
On some Linux systems, you may find that the exclusivecoind daemon process is killed when you log out.
If that is the case on you system, try to run it with nohup as a background process (&):
$ nohup exclusivecoind &To restart a daemon process after a server reboot
Although server reboots don't occur very often, it might be a good idea to start the exclusivecoin daemon process after a reboot.
The easiest way to do this is to start it from your crontab. To edit your crontab on most distributions:
- Run
crontab -eto edit the crontab file; - Scroll to the bottom of the file and add the following line:
@reboot exclusivecoind -daemon - Save the file and exit; the updated crontab file will be installed for you.
On most distributions, this will cause the Exclusivecoin daemon to be automatically started each time the server is rebooted.
No real need for backups
The masternode wallet will never contain any money and the configuration is pretty straightforward. There's no real need for backups in this case.
4. Now really start the masternode
Finally, we can really start and register the masternode:
- First start the masternode wallet or daemon (
exclusivecoind -daemon). It will then poll the masternode system to find its own registration.
On the client:
- Open you local client;
- Unlock your wallet if it is locked;
- Select the 'Masternodes' view (left), select your masternode configuration and click
StartorStart many. Your masternode will be registered with the system, for the masternode to pick it up.
Once your masternode picked up its registration, it will start doing its work and start pinging the system to prove it's running. It's this pinging that will keep your masternode alive in the masternode list.
If you get an error, like 'could not allocate vin', see the FAQ section.
5. Check if the masternode is really running
To check if your masternode is running:
In the debug log of the masternode
You can also look in de debugging output of your masternode:
- Open
debug.logof the masternode; - Scroll all the way down to the most recent output;
- Check the lines with
CActiveMasternode::in them. You should see this pattern:
# Masternode process was running, but not registered ('started') yet from the controlling wallet:
2017-07-04 15:46:33 CActiveMasternode::ManageStatus() - Could not find suitable coins!
2017-07-04 15:46:33 CActiveMasternode::Dseep() - Error: masternode is not in a running status
2017-07-04 15:46:33 CActiveMasternode::ManageStatus() - Error on Ping: masternode is not in a running status
2017-07-04 15:47:33 CActiveMasternode::ManageStatus() - Checking inbound connection to '{YOUR_IP:PORT}'
2017-07-04 15:47:33 CActiveMasternode::GetMasterNodeVin - Could not locate specified vin from possible list

# After starting the masternode from the controlling wallet:
2017-07-04 15:47:59 CActiveMasternode::EnableHotColdMasterNode() - Enabled! You may shut down the cold daemon.

# While it runs, it pings:
2017-07-04 15:48:33 CActiveMasternode::Dseep() - RelayMasternodeEntryPing vin = CTxIn(COutPoint({TRANSACTION_ID}, {INDEX}), scriptSig=)
2017-07-04 15:49:34 CActiveMasternode::Dseep() - RelayMasternodeEntryPing vin = CTxIn(COutPoint(({TRANSACTION_ID}, {INDEX}), scriptSig=)
#...
2017-07-05 12:30:28 CActiveMasternode::Dseep() - RelayMasternodeEntryPing vin = CTxIn(COutPoint(({TRANSACTION_ID}, {INDEX}), scriptSig=)
Most important lines you want to see are:
- EnableHotColdMasterNode: Enabled! You may shut down the cold daemon. This means the masternode picked up its own registration from the masternode list (including a reference to the 5000 EXCL collateral transaction).
- RelayMasternodeEntryPing vin = CTxIn(COutPoint(({TRANSACTION_ID}, {INDEX}), scriptSig=). This means the masternode is pinging the system to prove its running. As long as it's pinging, it will keep the masternode alive in the masternode list, else it will be removed after one hour.
On the local client
- Open the masternode list by clicking 'Masternodes' (left), 'ExclusiveCoin Network' (tab);
- Find your masternode by its IP address, port, public key of the account.
- Check the 'Active (secs)' and 'Last Seen' values of your masternode. If 'Active (secs)' shows 00m::00s, your masternode is probably not running (not pinging);
Note that this screen is quite buggy, it tends to loose track and show empty cells. Will be fixed.
If your masternode is not running or you get an error, see the Frequently Asked Questions and Errors below!
6. Close your local client and celebrate!
Now that the masternode is running, you can close your local client and wallet and keep your funds secure.
Congratulations, you have an ExclusiveCoin masternode running! It doesn't contain any funds and it will ping the system to keep its registration alive. And most importantly: you'll receive masternode payments for really running a masternode and supporting the Exclusivecoin network!
Enjoy!
Frequently Asked Questions and Errors
FAQ 1: On the client, I get an error Failed to start masternode. Error: Could not allocate vin!?
The 'vin' is the 5000 $EXCL collateral. You need that to successfully register your masternode. If you get this error, you'll have to double check the payment, the masternode configuration (on the client). You could also check for locked inputs.
Check your (client) wallet isn't locked
You will get this errror if your (client) wallet is locked, so first check that's not the case.
If so, you'll need to briefly unlock it to be able to register your masternodes. After registering, you can lock the wallet again (and even close the client and the pc).
Double-check your payments
If your wallet is not locked, lets go on and double check the payment.
- Click 'Help', 'Debug window', 'console' to open the console window;
- enter `masternode outputs` on the client.
That should give you a list of all the valid payments your client can find in its wallet. You should see an entry for each masternode.
If any of your payments is missing from the output, go to FAQ 2 ("I deposited 5000 EXCL, but it doesn't show up in masternode outputs").
If the transaction is there, lets go on.
Check the masternode configuration
Lets, lets double-check the masternode registration on the client.
- Open the 'Masternodes' menu (left)
- Select your masternode and click 'Edit'.
If this doesn't work: this is a bug in the software, open
masternode.confinstead (see FAQ 4). - Check the transaction ID and index (last two values, both in the UI and in the file).
They should be identical to the
masternode outputswe just saw. The transaction ID should not have any suffix like-000or-001(some block explorers add that).
If the transaction id an index are correct, lets try one last resort:
Check for locked masternode collateral
TODO: This was copied from a ChainCoin article and has not been confirmed to work for EXCL yet.
When a masternode is started from the client, its 5000 EXCL collateral is locked to prevent it from spending. So maybe the collateral for your masternode got locked while it shouldn't be. To fix this:
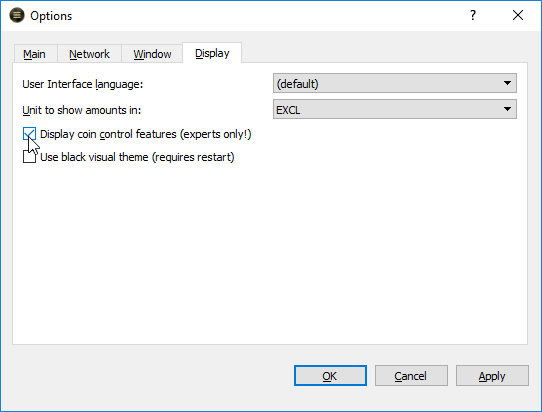
- Enable coin control features:
- Click 'Settings...' (menu), 'Options...', 'Display' (tab);
- Check 'Enable Coin Control features' checkbox;
- Click 'OK;
- Unlock the coins:
- Open the 'Send' menu (left);
- Click the 'Inputs...' button
- Expand the masternode account by clicking the arrow/triangle on the left
- Right-click the row with the lock icon and 5000 EXCL
- Select 'unlock unspent' from the contextual menu
- Close the Coin Control Inputs windows.
Now try to start your masternode again.
FAQ 2: I deposited 5000 EXCL, but it doesn't show up in masternode outputs!
in this case:
- the transaction was not confirmed yet (you'll have to wait at least 10 minutes), or
- you didn't deposit the collateral in exacly one transaction, or
- you didn't deposit exactly 5000 EXCL (maybe you forgot to add extra for the transaction fee?), or
- you may have accidently spent some of the 5000 EXCL in another transaction (see next question).
- you deposited the collateral to another account, not managed by this wallet.
In most cases, you can simply create a new account (in the same wallet) and transfer the coins again in one 5000 EXCL transaction. It may seem silly to transfer money within your own wallet, but we will need a valid blockchain transaction to use as a collateral for the masternode.
FAQ 3: On the masternode, I get the error Could not locate specified vin from possible list. Could not find suitable coins!
This means that masternode is polling the masternode list, looking for its own registration, but cannot find that yet.
To solve this:
- Check that the masternodekeys match up (the masternode unique key (in its
exclusivecoin.conf) should be the same as its corresponding key on the client registration, look in the masternode screen or in the clientsmasternodes.conf; - Then start (register) the masternode from the client. Either with the start button on the masternode control screen or by running
masternode start-alias {name}on the client. That will register the masternodekey and its 5000 payment with the network. The masternode should pick that up because it recognizes a (public) key in the list that matches its own masternodekey. - If it still doesn't, check the port forwarding on the server (masternode) side.
If all goes well, you should see a message Enabled! You may shut down the cold daemon in the masternodes' debug.log file. Also in that same log file, you should then see it ping the system to keep its registration alive. In a QT client, you will see that in the Exclusivecoin Network, your masternode will get an 'active (secs)' time other than '00m:00s', but that may take about 30 minutes to appear.
FAQ 4: On the client, when i click 'edit' or 'remove' masternode, nothing happens!
This seems to be a bug in the client.
Best solution for now it to edit the masternodes.conf file manually.
This file will contain 1 line for each masternode configuration. Each line contains (separated by spaces) the name, IP address + port, masternodekey, transaction id and transaction index (ususally 0 or 1):
Masternode1 1.2.3.4:23230 MASTERNODEKEY1 transaction1 0
Masternode2 1.2.3.4:23232 MASTERNODEKEY2 transaction2 0
Masternode3 1.2.3.4:23234 MASTERNODEKEY3 transaction3 1
Masternode4 1.2.3.4:23236 MASTERNODEKEY4 transaction4 0
When you're done, save the file. Don't forget to restart the client: close it by clicking 'File', 'Exit' (else it might just minimize) and then reopen it.
FAQ 5: Can I get coins out of my masternode account?
Yes, but you'll have to be very careful not to touch the 5000 EXCL collateral. Crypto transactions are technically complex. So e.g. moving 95 coins from 5095 may also involve some coins from the "5000 part". And that will shut down your masternode because some of the 5000 coins were 'spent', even if there is enough left in the wallet. So when taking coins out of you masternode wallet, you will need to use Coin Control to exclude toe 5000 EXCL collateral from your transaction.
To enable Coin Control:
- Click 'Settings...' (menu), 'Options...', 'Display' (tab);
- Check 'Enable Coin Control features' checkbox;
- Click 'OK'
In the 'Send' screen, you will now see Coin Control Features. Use the 'Inputs...' button to exclude your 5000 EXCL collateral from your transaction.
FAQ 6: My masternode stops running after one hour. Why?
If your masternode stops running after an hour, it probably wasn't running in the first place.
If the client tells you the masternode is 'running', it means that it was succesfully registered with the masternode list, but that doesn't guarantee the masternode itself is running. You might even receive masternode payments (see next question) but again, thats the result of a succesful registration, not a running masternode.
To check if you masternode is really running, follow the steps in #5 of the masternode installation guide above.
FAQ 7: I'm receiving masternode payouts. Does that prove my masternode is running?
No, it does not.
Curiously enough, you will recieve masternode payouts a soon as you register your masternode with the system from your local wallet, even if the masternode itself is not running. That will only last about an hour though, because if your masternode doesn't ping the system it's alive, it will be removed from the masternode list after one hour. It may seem like your masternode stopped running, but it probably was not running in the first place.
To check if you masternode is really running, follow the steps in #5 of the masternode installation guide above.
FAQ 8: How much EXCL will I get for running a masternode?
At the moment, there are about 100 masternodes. Block time is 1 minute, so you will recieve 1 masternode payout (0.5 EXCL) every 100 minutes. That's 7.2 EXCL per day or 2628 EXCL per year.
As an indication: with a EXCL price of 0.0002 BTC and a Bitcoin price of $ 2000, this would be about $ 1050 per year.
FAQ 9: Can I run multiple masternodes on one server?
Yes, you can. But you should configure them to each have their own copy of the blockchain to work on, else they will modify the same files concurrently.
You can each instance use it's own data directory by using the -datadir= parameter.
Also make sure you have enough memory, you'll need about 1GB for each masternode.
And finally, masternodes can share the same IP, but each masternode should be accessible by its own unique port.
Use the -port=nnnnn parameter at startup or put port=nnnnn in the exclusivecoin.conf configuration file.
Other questions or errors?
Please let me know in a mail or the Slack-group (see below). We'll solve it together and I'll add all errors and solutions to this document.
Feedback
I tried to make this tutorial correct and complete. But to make it the best masternode installation guide of all, I will need your suggestions and feedback. So if you find any errors or have suggestions to make it better, please let me know!
I will install Disqus feedback on this website soon.
Until then, just send me a mail: 
I'm also in the exclusivecoin slack group @relaxcl.
I spent about 3 days writing this manual.
If you'd like to tip me, this is my EXCL tip jar: ESJjZy1WrdL4Hv5kunNm5FbDCp16DDS3zz.
Just make sure not to damage your EXCL collateral by tipping me (see FAQ 5, above). Be safe.